Dim findChar As String() = {vbTab, vbCr, vbLf, "~", "(", ")", "#", "\", "/", "=", ">", "<", "+", "-", "*", "%", "&", "|", "^", "'", "[", "]", """"}

Dim lstPattern As New List(Of String)
For Each s As String In findChar
    lstPattern.Add(System.Text.RegularExpressions.Regex.Escape(s))
Next
Dim sPattern As String = String.Join("|", lstPattern.ToArray)

Dim sInput As String = Me.TextBox1.Text
sInput = System.Text.RegularExpressions.Regex.Replace(sInput, sPattern, "[$&]")

Dim tbl As DataTable = ごにょごにょ
Dim viw As New DataView(tbl)
viw.RowFilter = "Column1 Like '%" & sInput & "%'"
.NET RowFilterでEvaluateExceptionが発生した場合のエスケープ
DataViewのRowFilterを利用してデータを抽出するとき
特殊文字をエスケープしないとEvaluateExceptionが発生します。
エスケープは文字を角かっこ[]で囲みます。


Android Spinnerで表示する値と実際に使用する内部的な値
Spinnerで表示する値と、実際に使用する内部的な値を変えたい場合の方法です。
いろいろな方法があるようですが、ArrayAdapterを拡張する方法です。
まず内部的な値(Key)と表示する値(Value)のペアとなるクラスを作成しました。
Androidにはキーと値のペアを表すPair<T,T>クラスがあるのですが、
キーはInteger、値はStringという場合がほとんどで、Pair<Integer,String>とイチイチ書くのが面倒なので作っておきます。
このクラスはなくてもいいです。
その場合はKeyValuePairを使用している箇所はPair<Integer,String>と読み替えてください。
public class KeyValuePair extends Pair<Integer,String> {

    public KeyValuePair(Integer key, String value) {
        super(key, value);
    }

    public Integer getKey(){
        return super.first;
    }

    public String getValue(){
        return super.second;
    }
}
次にArrayAdapterを継承しKeyValuePairArrayAdapterクラスを作成します。
getViewメソッドでスピナー部分に表示する値を返すようにします。
getDropDownViewメソッドでスピナーのドロップダウンに表示する値を返すようにします。
getPositionメソッドでスピナーに設定した値リストから、内部で使用する値(キー)の要素番号を返すようにします。
    public class KeyValuePairArrayAdapter extends ArrayAdapter<KeyValuePair> {

    /**
     * @brief コンストラクタ
     * @param context
     * @param textViewResourceId
     */
    public KeyValuePairArrayAdapter(Context context, int textViewResourceId) {
        super(context, textViewResourceId);
    }
    /**
     * @brief コンストラクタ
     * @param context
     * @param textViewResourceId
     * @param list
     */
    public KeyValuePairArrayAdapter(Context context, int textViewResourceId, List<KeyValuePair> list) {
        super(context, textViewResourceId, list);
    }

    /**
     * @brief Spinerに表示するViewを取得します。
     */
    @Override
    public View getView(int position, View convertView, ViewGroup parent) {
        TextView view = (TextView) super.getView(position, convertView, parent);
        view.setText(getItem(position).getValue());
        return view;

    }
    /**
     * @brief Spinerのドロップダウンアイテムに表示するViewを取得します。
     */
    @Override
    public View getDropDownView(int position, View convertView, ViewGroup parent) {
        TextView view = (TextView) super.getDropDownView(position, convertView, parent);
        view.setText(getItem(position).getValue());
        return view;
    }

    /**
     * @brief keyに一致するインデックスを取得します。
     * @param key
     * @return
     */
    public int getPosition(int key){
        int position = -1;
        for (int i = 0 ; i < this.getCount(); i++){
            if (this.getItem(i).getKey() == key) {
                position = i;
                break;
            }
        }
        return position;

    }

}
実際に使用する際のコードです。
まずはベタっとした場合
public class MainActivity extends Activity {

    private Spinner _spinner = null;

    @Override
    public void onCreate(Bundle savedInstanceState) {
        super.onCreate(savedInstanceState);
        setContentView(R.layout.activity_main);

        //スピナー
        _spinner =  (Spinner)this.findViewById(R.id.spinner1);
        _spinner.setOnItemSelectedListener(Spinner1_OnItemSelectedListener);
        //スピナーのドロップダウンアイテムを設定
        KeyValuePairArrayAdapter adapter = new KeyValuePairArrayAdapter(this, android.R.layout.simple_spinner_item);
        adapter.setDropDownViewResource(android.R.layout.simple_spinner_dropdown_item);
        adapter.add(new KeyValuePair(1,"One"));
        adapter.add(new KeyValuePair(2,"Two"));
        adapter.add(new KeyValuePair(3,"Three"));
        _spinner.setAdapter(adapter);
        //キーが2の値を選択する
        Integer selectKey = 2;
        _spinner.setSelection(adapter.getPosition(selectKey));
    }

    /**
     * @brief スピナーのOnItemSelectedListener
     */
    private OnItemSelectedListener Spinner1_OnItemSelectedListener = new OnItemSelectedListener() {
        public void onItemSelected(AdapterView<?> parent, View view, int position, long id) {
            KeyValuePair item = (KeyValuePair)_spinner.getSelectedItem();
            Toast.makeText(MainActivity.this, item.getKey().toString(), Toast.LENGTH_LONG).show();
        }
        public void onNothingSelected(AdapterView<?> arg0) {
        }
    };

}
次はデータベースのデータの場合
public class MainActivity extends Activity {

    private Spinner _spinner = null;

    @Override
    public void onCreate(Bundle savedInstanceState) {
        super.onCreate(savedInstanceState);
        setContentView(R.layout.activity_main);

        //スピナー
        _spinner =  (Spinner)this.findViewById(R.id.spinner1);
        _spinner.setOnItemSelectedListener(Spinner1_OnItemSelectedListener);
        //スピナーのドロップダウンアイテムを設定
        List<KeyValuePair> list = getSpinnerData();
        KeyValuePairArrayAdapter adapter = new KeyValuePairArrayAdapter(this, android.R.layout.simple_spinner_item, list);
        adapter.setDropDownViewResource(android.R.layout.simple_spinner_dropdown_item);
        _spinner.setAdapter(adapter);
        //キーが2の値を選択する
        Integer selectKey = 2;
        _spinner.setSelection(adapter.getPosition(selectKey));
    }

    /**
     * @brief スピナーデータを取得します。
     * @return
     */
    private List<KeyValuePair> getSpinnerData(){
        StringBuilder sql = new StringBuilder();
        sql.append(" SELECT Code, Name");
        sql.append(" FROM MYTABLE");

        List<KeyValuePair> list = new ArrayList<KeyValuePair>();
        DatabaseHelper dbhelper = new DatabaseHelper(this);
        SQLiteDatabase db = dbhelper.getReadableDatabase();
        try {
            Cursor cursor = db.rawQuery(sql.toString(), null);
            cursor.moveToFirst();
            try {
                while (cursor.moveToNext()){
                    list.add(new KeyValuePair(cursor.getInt(0),cursor.getString(1)));
                }
            } finally {
                cursor.close();
            }
        } finally {
            db.close();
        }
        return list;
    }
    /**
     * @brief スピナーのOnItemSelectedListener
     */
    private OnItemSelectedListener Spinner1_OnItemSelectedListener = new OnItemSelectedListener() {
        public void onItemSelected(AdapterView<?> parent, View view, int position, long id) {
            KeyValuePair item = (KeyValuePair)_spinner.getSelectedItem();
            Toast.makeText(MainActivity.this, item.getKey().toString(), Toast.LENGTH_LONG).show();
        }
        public void onNothingSelected(AdapterView<?> arg0) {
        }
    };

}
最後にリソースで定義したデータの場合
リソース
<?xml version="1.0" encoding="utf-8"?>
<resources>

    <!-- Spinner1のドロップダウンアイテム -->
    <string-array name="spinner1_item1">
       <item name="key">1</item>
       <item name="value">One</item>
    </string-array>
    <string-array name="spinner1_item2">
       <item name="key">2</item>
       <item name="value">Two</item>
    </string-array>
    <string-array name="spinner1_item3">
       <item name="key">3</item>
       <item name="value">Three</item>
    </string-array>

    <array name="spinner1_data">
       <item>@array/spinner1_item1</item>
        <item>@array/spinner1_item2</item>
        <item>@array/spinner1_item3</item>
    </array>

</resources>
アクティビティ
public class MainActivity extends Activity {

    private Spinner _spinner = null;

    @Override
    public void onCreate(Bundle savedInstanceState) {
        super.onCreate(savedInstanceState);
        setContentView(R.layout.activity_main);

        //スピナー
        _spinner =  (Spinner)this.findViewById(R.id.spinner1);
        _spinner.setOnItemSelectedListener(Spinner1_OnItemSelectedListener);
        //スピナーのドロップダウンアイテムを設定
        List<KeyValuePair> list = getSpinnerData();
        KeyValuePairArrayAdapter adapter = new KeyValuePairArrayAdapter(this, android.R.layout.simple_spinner_item, list);
        adapter.setDropDownViewResource(android.R.layout.simple_spinner_dropdown_item);
        _spinner.setAdapter(adapter);
        //キーが2の値を選択する
        Integer selectKey = 2;
        _spinner.setSelection(adapter.getPosition(selectKey));
    }

    /**
     * @brief スピナーデータを取得します。
     * @return
     */
    private List<KeyValuePair> getSpinnerData(){
        List<KeyValuePair> list = new ArrayList<KeyValuePair>();
        Resources res = getResources();
        TypedArray spinner1_data = res.obtainTypedArray(R.array.spinner1_data);
        for (int i = 0; i < spinner1_data.length(); ++i) {
            int id = spinner1_data.getResourceId(i, -1);
            if (id > -1) {
                String[] item = res.getStringArray(id);
                list.add(new KeyValuePair(Integer.valueOf(item[0]), item[1]));
            }
        }
        spinner1_data.recycle();
        return list;
    }
    /**
     * @brief スピナーのOnItemSelectedListener
     */
    private OnItemSelectedListener Spinner1_OnItemSelectedListener = new OnItemSelectedListener() {
        public void onItemSelected(AdapterView<?> parent, View view, int position, long id) {
            KeyValuePair item = (KeyValuePair)_spinner.getSelectedItem();
            Toast.makeText(MainActivity.this, item.getKey().toString(), Toast.LENGTH_LONG).show();
        }
        public void onNothingSelected(AdapterView<?> arg0) {
        }
    };

}
Android エミュレータのSDカードにファイルを配置する
まずエミュレータにSDカードを作成します。
エクリプスのメニューより「ウィンドウ」→「AVDマネージャー」を選択します。
開いたダイアログよりSDカードを作成するエミュレータを選択し「編集」ボタンをクリックします。
 SDカードに512MのSDカードを作成しました。
「AVDの編集」をクリックしダイアログを終了します。
SDカードに512MのSDカードを作成しました。
「AVDの編集」をクリックしダイアログを終了します。
 SDカードが作成できたら「開始」ボタンでエミュレータを起動します。
 エミュレータが起動したらエクリプスのメニューより「ウィンドウ」→「パースペクティブを開く」→「その他」→「DDMS」を選択します。
「ファイル・エクスプローラ」タブにsdcardが見えていると思います。
私のエミュレータではmntフォルダの下にsdcardが有りました。
最初はトップ階層のsdcardだと思って「なんでフォルダじゃないんだろう」なんて悩んでしまいました。
情報列の「mnt/sdcard」の意味がわからなかった・・・
エミュレータが起動したらエクリプスのメニューより「ウィンドウ」→「パースペクティブを開く」→「その他」→「DDMS」を選択します。
「ファイル・エクスプローラ」タブにsdcardが見えていると思います。
私のエミュレータではmntフォルダの下にsdcardが有りました。
最初はトップ階層のsdcardだと思って「なんでフォルダじゃないんだろう」なんて悩んでしまいました。
情報列の「mnt/sdcard」の意味がわからなかった・・・
 右上の「pull a file」ボタンと[push a file」ボタンでSDカードにファイルを配置したり取り出したりできます。
私の環境では日本語名のファイルは「push a file」ボタンで配置できませんでした。
DDMSでファイルを配置できない場合は、コマンドプロンプトから以下のコマンドを入力します。
※ファイルを配置するには
>adb push C:\Sample.txt /sdcard/
adb push <PCにあるファイル> <デバイスのフォルダ>
※ファイルを取り出すには
adb pull <デバイスファイル名> <PCのファイル名>
右上の「pull a file」ボタンと[push a file」ボタンでSDカードにファイルを配置したり取り出したりできます。
私の環境では日本語名のファイルは「push a file」ボタンで配置できませんでした。
DDMSでファイルを配置できない場合は、コマンドプロンプトから以下のコマンドを入力します。
※ファイルを配置するには
>adb push C:\Sample.txt /sdcard/
adb push <PCにあるファイル> <デバイスのフォルダ>
※ファイルを取り出すには
adb pull <デバイスファイル名> <PCのファイル名>


Android TabActivityとTabHostを使用してTab画面を表示する
2012/11/19 追記
TabHostを使用する方法はAndroid 3.0 以降は非推奨となりました。
TabHostを使用せずにタブ画面を表示する方法はコチラ
Android ActionBarとFragmentを使用してTab画面を表示する(Android 4.0以上)
Android ActionBarとFragmentを使用してTab画面を表示する(Android 2.x)
むかし2年程前にタブメニューについて調べたんです。コレ→「Android タブ画面を表示する」 今回タブを使おうと思って昔の記事を読んでみたんですが・・・全然わかんないわぁ(;´д`) 自分で読んでも何を書いてるのかわかんないのに、二人の人が役にたったとリアクションしてくれてます。ゴメンナサイ 結局、私の役にはたたなかったので、ほかの人のブログを参考にしました。 自分の調べた事をメモるブログなのに意味ないしっ(>_<) 気を取り直して、再度調べた事をまとめておきます。 タブメニューを作成するにはTabHostウィジェットを使用します。 ActivityにTabHostを配置し、ActivityのonCreate()でTabHostにタブを追加します。 各タブをクリックしたときに表示するコンテンツですが、以下の3通りがあるようです。
 アウトラインを見ると以下のようになっていると思います。
 activity_main.xml

TabHostを使用する方法はAndroid 3.0 以降は非推奨となりました。
TabHostを使用せずにタブ画面を表示する方法はコチラ
Android ActionBarとFragmentを使用してTab画面を表示する(Android 4.0以上)
Android ActionBarとFragmentを使用してTab画面を表示する(Android 2.x)
むかし2年程前にタブメニューについて調べたんです。コレ→「Android タブ画面を表示する」 今回タブを使おうと思って昔の記事を読んでみたんですが・・・全然わかんないわぁ(;´д`) 自分で読んでも何を書いてるのかわかんないのに、二人の人が役にたったとリアクションしてくれてます。ゴメンナサイ 結局、私の役にはたたなかったので、ほかの人のブログを参考にしました。 自分の調べた事をメモるブログなのに意味ないしっ(>_<) 気を取り直して、再度調べた事をまとめておきます。 タブメニューを作成するにはTabHostウィジェットを使用します。 ActivityにTabHostを配置し、ActivityのonCreate()でTabHostにタブを追加します。 各タブをクリックしたときに表示するコンテンツですが、以下の3通りがあるようです。
- TabHostを配置したアクティビティに定義したViewを表示する。
- 他のアクティビティを表示する
- layoutファイルに定義したViewを表示する
TabHostを配置したアクティビティに定義したViewを表示する
ActivityにTabHostを配置します。
TabHost(id/tabhost)
 |--LinearLayout
    |--TabWidget(id/tabs)
      |--FrameLayout(id/tabcontent)
        |--LinearLayout(id/tabs1)
        |--LinearLayout(id/tabs2)
        |--LinearLayout(id/tabs3)
注意点は以下の3点です。
- TabHostはidがtabhostであること。
- TabWidgetはidがtabsであること。
- FrameLayoutはidがtabcontentであること。

<RelativeLayout xmlns:android="http://schemas.android.com/apk/res/android"
    xmlns:tools="http://schemas.android.com/tools"
    android:layout_width="match_parent"
    android:layout_height="match_parent" >

    <TabHost
        android:id="@android:id/tabhost"
        android:layout_width="fill_parent"
        android:layout_height="fill_parent"
        android:layout_alignParentLeft="true"
        android:layout_alignParentTop="true" >

        <LinearLayout
            android:layout_width="match_parent"
            android:layout_height="match_parent"
            android:orientation="vertical" >

            <TabWidget
                android:id="@android:id/tabs"
                android:layout_width="match_parent"
                android:layout_height="wrap_content" >
            </TabWidget>

            <FrameLayout
                android:id="@android:id/tabcontent"
                android:layout_width="match_parent"
                android:layout_height="match_parent" >

                <LinearLayout
                    android:id="@+id/tab1"
                    android:layout_width="match_parent"
                    android:layout_height="match_parent" >

                    <TextView
                        android:id="@+id/textView1"
                        android:layout_width="wrap_content"
                        android:layout_height="wrap_content"
                        android:text="Tabページ1" />

                </LinearLayout>

                <LinearLayout
                    android:id="@+id/tab2"
                    android:layout_width="match_parent"
                    android:layout_height="match_parent" >

                    <TextView
                        android:id="@+id/textView2"
                        android:layout_width="wrap_content"
                        android:layout_height="wrap_content"
                        android:text="Tabページ2" />

                </LinearLayout>

                <LinearLayout
                    android:id="@+id/tab3"
                    android:layout_width="match_parent"
                    android:layout_height="match_parent" >

                    <TextView
                        android:id="@+id/textView3"
                        android:layout_width="wrap_content"
                        android:layout_height="wrap_content"
                        android:text="Tabページ3" />

                </LinearLayout>

            </FrameLayout>
        </LinearLayout>
    </TabHost>

</RelativeLayout>
タブ部分に表示するテキストをres/values/strings.xmlに定義します。
<resources>
    :
    :
    <string name="tab1">ページ1</string>
    <string name="tab2">ページ2</string>
    <string name="tab3">ページ3</string>
</resources>
ActivityはTabActivityを継承して作成し、onCreate()でTabHostに各タブを追加していきます。
TabSpec#setIndicator()でタブ部分の文字を指定します。
TabSpec#setContent()でタブをクリックした時に表示するViewのidを指定します。
ここではactivity_main.xmlにある3つのLinearLayoutのidです。
MainActivity.java
public class MainActivity extends TabActivity {

    private static final String TAB[] = {"tab1", "tab2","tab3" };

    @Override
    public void onCreate(Bundle savedInstanceState) {
        super.onCreate(savedInstanceState);
        setContentView(R.layout.activity_main);

        //TabHostオブジェクト取得
        TabHost tabhost = getTabHost();
        //Tab1設定
        TabSpec tab1 = tabhost.newTabSpec(TAB[0]);
        tab1.setIndicator(this.getResources().getString(R.string.tab1));
        tab1.setContent(R.id.tab1);
        tabhost.addTab(tab1);
        //Tab2設定
        TabSpec tab2 = tabhost.newTabSpec(TAB[1]);
        tab2.setIndicator(this.getResources().getString(R.string.tab2));
        tab2.setContent(R.id.tab2);
        tabhost.addTab(tab2);
        //Tab3設定
        TabSpec tab3 = tabhost.newTabSpec(TAB[2]);
        tab3.setIndicator(this.getResources().getString(R.string.tab3));
        tab3.setContent(R.id.tab3);
        tabhost.addTab(tab3);
        //初期表示するタブ
        tabhost.setCurrentTab(0);
    }

    @Override
    public boolean onCreateOptionsMenu(Menu menu) {
        getMenuInflater().inflate(R.menu.activity_main, menu);
        return true;
    }

}

他のアクティビティを表示する
次はタブをクリックした時に表示するコンテンツにActivityを指定する方法です。 まずTabHostを配置したメインとなるアクティビティを1つ作成します。 そしてタブをクリックした時に表示するアクティビティをタブの数だけ作成します。 つまりタブが3つある画面であれば4つのアクティビティを作成することになります。 各タブのコンテンツとなるアクティビティ「Tab1Activity.java」、「Tab2Activity.java」、「Tab3Activity.java」を作成します。 各アクティビティには、それぞれの違いがわかるように適当にウィジェットを配置しておきます。 次にメインとなるActivityを作成します。 こちらは「TabHostを配置したアクティビティに定義したViewを表示する」で作成したMainActivity.javaとほぼ同じです。 違いは、TabSpec#setContent()でアクティビティを指定します。 MainActivity.java
public class MainActivity extends TabActivity {

    private static final String TAB[] = {"tab1", "tab2","tab3" };

    @Override
    public void onCreate(Bundle savedInstanceState) {
        super.onCreate(savedInstanceState);
        setContentView(R.layout.activity_main);

        //TabHostオブジェクト取得
        TabHost tabhost = getTabHost();
        //Tab1設定
        TabSpec tab1 = tabhost.newTabSpec(TAB[0]);
        tab1.setIndicator(this.getResources().getString(R.string.tab1));
        tab1.setContent(new Intent().setClass(this, Tab1Activity.class));
        tabhost.addTab(tab1);
        //Tab2設定
        TabSpec tab2 = tabhost.newTabSpec(TAB[1]);
        tab2.setIndicator(this.getResources().getString(R.string.tab2));
        tab2.setContent(new Intent().setClass(this, Tab2Activity.class));
        tabhost.addTab(tab2);
        //Tab3設定
        TabSpec tab3 = tabhost.newTabSpec(TAB[2]);
        tab3.setIndicator(this.getResources().getString(R.string.tab3));
        tab3.setContent(new Intent().setClass(this, Tab3Activity.class));
        tabhost.addTab(tab3);
        //初期表示するタブ
        tabhost.setCurrentTab(0);
    }

    @Override
    public boolean onCreateOptionsMenu(Menu menu) {
        getMenuInflater().inflate(R.menu.activity_main, menu);
        return true;
    }

}
この方法はアクティビティがいっぱいになるのがイヤだな・・・
layoutファイルに定義したViewを表示する
最後にTabをクリックした時に表示するコンテンツに、res/layoutに作成したファイルを表示する方法です。 これが一番よいのではと思っています。 res/layoutを右クリックし「新規」→「その他」→「Android XML レイアウト・ファイル」を選択し 「tab1.xml」、「tab2.xml」、「tab3.xml」を作成します。 ルート要素はLinearLayoutにし、それぞれの違いがわかるように適当にウィジェットを配置しておきます。 次にメインとなるActivityを作成します。 こちらは「TabHostを配置したアクティビティに定義したViewを表示する」で作成したMainActivity.javaとほぼ同じです。 違いは、TabSpec#setContent()でTabContentFactoryインターフェースを実装したクラスを指定します。 TabContentFactoryのcreateTabContent()メソッドで先ほど作成したレイアウトファイルを返すようにします。 MainActivity.java
public class MainActivity extends TabActivity {

    private static final String TAB[] = {"tab1", "tab2","tab3" };

    @Override
    public void onCreate(Bundle savedInstanceState) {
        super.onCreate(savedInstanceState);
        setContentView(R.layout.activity_main);

        //タブに表示するViewをlayoutより取得する
        LayoutInflater layout = LayoutInflater.from(MainActivity.this);
        final View viewTab1 = layout.inflate(R.layout.tab1, null);
        final View viewTab2 = layout.inflate(R.layout.tab2, null);
        final View viewTab3 = layout.inflate(R.layout.tab3, null);
        //TabHostオブジェクト取得
        TabHost tabhost = getTabHost();
        //Tab1設定
        TabSpec tab1 = tabhost.newTabSpec(TAB[0]);
        tab1.setIndicator(this.getResources().getString(R.string.tab1));
        tab1.setContent(new TabHost.TabContentFactory (){
            public View createTabContent(String tag) {return viewTab1;}
        });
        tabhost.addTab(tab1);
        //Tab2設定
        TabSpec tab2 = tabhost.newTabSpec(TAB[1]);
        tab2.setIndicator(this.getResources().getString(R.string.tab2));
        tab2.setContent(new TabHost.TabContentFactory (){
            public View createTabContent(String tag) {return viewTab2;}
        });
        tabhost.addTab(tab2);
        //Tab3設定
        TabSpec tab3 = tabhost.newTabSpec(TAB[2]);
        tab3.setIndicator(this.getResources().getString(R.string.tab3));
        tab3.setContent(new TabHost.TabContentFactory (){
            public View createTabContent(String tag) {return viewTab3;}
        });
        tabhost.addTab(tab3);
        //初期表示するタブ
        tabhost.setCurrentTab(0);
    }

    @Override
    public boolean onCreateOptionsMenu(Menu menu) {
        getMenuInflater().inflate(R.menu.activity_main, menu);
        return true;
    }

}
今回はちゃんとまとめられたと思うっ( *`ω´)
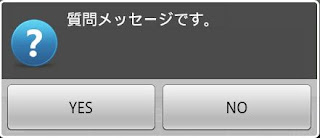
Android AlertDialogに画像を表示する
以前のAndroid AlertDialogを表示する の「独自のレイアウトを表示する」方法を利用してAlertDialogに画像を表示します。



 ファイル名を「color」としルート要素に「resources」を選択します。
 白色を定義します。
res/values/color.xml
白色を定義します。
res/values/color.xml
 ファイル名を「alert」としルート要素に「LinearLayout」を選択しました。
 レイアウトファイルには
画像を表示するためのImageViewとメッセージを表示するためのTextViewを配置します。
TextViewのTextColorは先ほど作成した色リソースの白を指定します。
色リソースがEclipseに認識されない場合はプロジェクトのクリーンを行ってください。
res/layout/alert.xml
レイアウトファイルには
画像を表示するためのImageViewとメッセージを表示するためのTextViewを配置します。
TextViewのTextColorは先ほど作成した色リソースの白を指定します。
色リソースがEclipseに認識されない場合はプロジェクトのクリーンを行ってください。
res/layout/alert.xml


画像の用意
まずAlertDialogに配置する画像を用意します。 画像はファイルエクスプローラーから\res\drawableフォルダに直接配置します。 drawableフォルダがなければ作成してください。 Androidは .png ( 推奨 )、.jpg ( 容認 )、.gif ( 非推奨 ) の 3つのフォーマットのビットマップをサポートします。 Eclipseが画像を自動で認識して、プロジェクトエクスプローラのres/drawableにそれぞれの画像が表示されます。 画像が読み込まれない場合、メニュー「プロジェクト」→「クリーン」を行ってください。
リソースファイルの用意
AlertDialogのメッセージの文字色を白色にしたいので、色リソースを定義します。 Eclipseのプロジェクトエクスプローラのres/valuesを右クリックし「新規」→「その他」→「Android XML 値ファイル」を選択します。

<?xml version="1.0" encoding="utf-8"?>
<resources>
     <color name="white">#FFFFFF</color>
</resources>
レイアウトファイルの用意
Eclipseのプロジェクトエクスプローラのres/layoutを右クリックし「新規」→「その他」→「Android XML レイアウト・ファイル」を選択します。

<?xml version="1.0" encoding="utf-8"?>

<LinearLayout xmlns:android="http://schemas.android.com/apk/res/android"
     android:layout_width="wrap_content"
     android:layout_height="wrap_content" >
     <ImageView
          android:id="@+id/imageAlertIcon"
          android:layout_width="60dp"
          android:layout_height="60dp" />
     <TextView
          android:id="@+id/lblMessage"
          android:layout_width="258dp"
          android:layout_height="match_parent"
          android:text="TextView"
          android:textColor="@color/white" />

</LinearLayout>
AlertDialogを表示するクラスの用意
AlertDialogを表示するクラスAlertHelperクラスを作成します。(ここら辺はおこのみで) レイアウトファイルの用意で作成したalertレイアウトを取得し ImageViewに画像を、TextViewにメッセージを表示します。
public class AlertHelper {

    /**
     * 警告メッセージを表示します。
     * @param context
     * @param message
     * @param listenerOK
     */
    public static void showWarning(Context context,String message,DialogInterface.OnClickListener listenerOK){
        LayoutInflater inflater = LayoutInflater.from(context);
        final View view = inflater.inflate(R.layout.alert,null);
        ImageView imgAlertIcon = (ImageView)view.findViewById(R.id.imageAlertIcon);
        imgAlertIcon.setImageResource(R.drawable.warning);
        TextView lblMessage = (TextView)view.findViewById(R.id.lblMessage);
        lblMessage.setText(message);
        AlertDialog.Builder alert = new AlertDialog.Builder(context);
        alert.setPositiveButton("OK",listenerOK);
        alert.setView(view);
        alert.show();
    }

    /**
     * エラーメッセージを表示します。
     * @param context
     * @param message
     * @param listenerOK
     */
    public static void showError(Context context,String message,DialogInterface.OnClickListener listenerOK){
        LayoutInflater inflater = LayoutInflater.from(context);
        final View view = inflater.inflate(R.layout.alert,null);
        ImageView imgAlertIcon = (ImageView)view.findViewById(R.id.imageAlertIcon);
        imgAlertIcon.setImageResource(R.drawable.error);
        TextView lblMessage = (TextView)view.findViewById(R.id.lblMessage);
        lblMessage.setText(message);
        AlertDialog.Builder alert = new AlertDialog.Builder(context);
        alert.setPositiveButton("OK",listenerOK);
        alert.setView(view);
        alert.show();
    }

    /**
     * 情報メッセージを表示します。
     * @param context
     * @param message
     * @param listenerOK
     */
    public static void showInformation(Context context,String message,DialogInterface.OnClickListener listenerOK){
        LayoutInflater inflater = LayoutInflater.from(context);
        final View view = inflater.inflate(R.layout.alert,null);
        ImageView imgAlertIcon = (ImageView)view.findViewById(R.id.imageAlertIcon);
        imgAlertIcon.setImageResource(R.drawable.information);
        TextView lblMessage = (TextView)view.findViewById(R.id.lblMessage);
        lblMessage.setText(message);
        AlertDialog.Builder alert = new AlertDialog.Builder(context);
        alert.setPositiveButton("OK",listenerOK);
        alert.setView(view);
        alert.show();
    }

    /**
     * 質問メッセージを表示します。
     * @param context
     * @param message
     * @param listenerOK
     */
    public static void showQuestion(Context context,String message,DialogInterface.OnClickListener listenerYes,DialogInterface.OnClickListener listenerNo){
        LayoutInflater inflater = LayoutInflater.from(context);
        final View view = inflater.inflate(R.layout.alert,null);
        ImageView imgAlertIcon = (ImageView)view.findViewById(R.id.imageAlertIcon);
        imgAlertIcon.setImageResource(R.drawable.question);
        TextView lblMessage = (TextView)view.findViewById(R.id.lblMessage);
        lblMessage.setText(message);
        AlertDialog.Builder alert = new AlertDialog.Builder(context);
        alert.setPositiveButton("YES",listenerYes);
        alert.setNegativeButton("NO", listenerNo);
        alert.setView(view);
        alert.show();
    }
}
質問メッセージを表示してみます。
public class MainActivity extends Activity {
     public void button1Click(View view) {
         OnClickListener listenerYes = new OnClickListener(){
            public void onClick(DialogInterface dialog, int which) {
                Toast.makeText(MainActivity.this, "Yes", Toast.LENGTH_LONG).show();
            }
         };
        AlertHelper.showQuestion(this, "質問メッセージです。", listenerYes , null);
     }
}
Android SDカードに配置したデータベースにアクセスする
SDカードに配置したデータベースにアクセスするには
マニフェストファイルにSD カードのコンテンツの変更/削除の権限を与える設定を行います。
SQLiteOpenHelperを継承したクラスのデータベース名にSDカードのデータベースパスを指定します。
マニフェストファイルにSD カードのコンテンツの変更/削除の権限を与える設定を行います。
SQLiteOpenHelperを継承したクラスのデータベース名にSDカードのデータベースパスを指定します。
public class DatabaseHelperTest extends SQLiteOpenHelper {

    /* データベース名 */
    //private final static String DB_NAME = "HelloAndroid.db";
    private final static String DB_NAME = Environment.getExternalStorageDirectory() + "/HelloAndroid.db";
    /* データベースのバージョン */
    private final static int DB_VER = 1;

    /*
     * コンストラクタ
      */
    public DatabaseHelperTest(Context context) {
        super(context, DB_NAME, null, DB_VER);
    }

    @Override
    public void onCreate(SQLiteDatabase db) {
        // TODO 自動生成されたメソッド・スタブ
    }

    @Override
    public void onUpgrade(SQLiteDatabase db, int oldVersion, int newVersion) {
        // TODO 自動生成されたメソッド・スタブ
    }

}
あとは従来通りにsqlを発行すればOKです。
Android SDカードに配置したデータベースをデータベースフォルダにコピーする
SDカードに配置したSQLiteデータベースをデータベースフォルダにコピーします。
public class MainActivity extends Activity {

    public void button1Click(View view){
        try {
            final String DB_NAME = "HelloAndroid.db";
            //既存データベースを削除
            this.deleteDatabase(DB_NAME);
            //コピー元パス(SDカード)
            String pathFrom = Environment.getExternalStorageDirectory().getPath() + "/" + DB_NAME;
            //コピー先パス(データベースフォルダ)
            String pathTo = this.getDatabasePath(DB_NAME).getPath();
            //コピー
            FileInputStream fis = new FileInputStream(pathFrom);
            FileChannel channelFrom = fis.getChannel();
            FileOutputStream fos = new FileOutputStream(pathTo);
            FileChannel channeTo = fos.getChannel();
            try {
                channelFrom.transferTo(0, channelFrom.size(), channeTo);
            } finally {
                fis.close();
                channelFrom.close();
                fos.close();
                channeTo.close();
            }
        } catch (Exception e) {
            e.printStackTrace();
        }
    }
}
DatabaseHelperのonCreateでやれば良いと思う。
登録:
投稿 (Atom)
